Introduction
Growing up in my grandmother’s kitchen, I learned that the best recipes often come from the most unexpected moments. Last March, my daughter Lily discovered a box of limited edition green clover Lucky Charms while we were grocery shopping, her eyes lighting up like she’d found buried treasure. “Daddy, can we make something special with these?” she asked, clutching the box tight. That afternoon, we created what would become our new family tradition: Clover Bars. These delightful treats combine the nostalgic crunch of Lucky Charms cereal with gooey marshmallows, creating a no-bake dessert that’s perfect for St. Patrick’s Day celebrations or any time you need a little extra luck in your life.
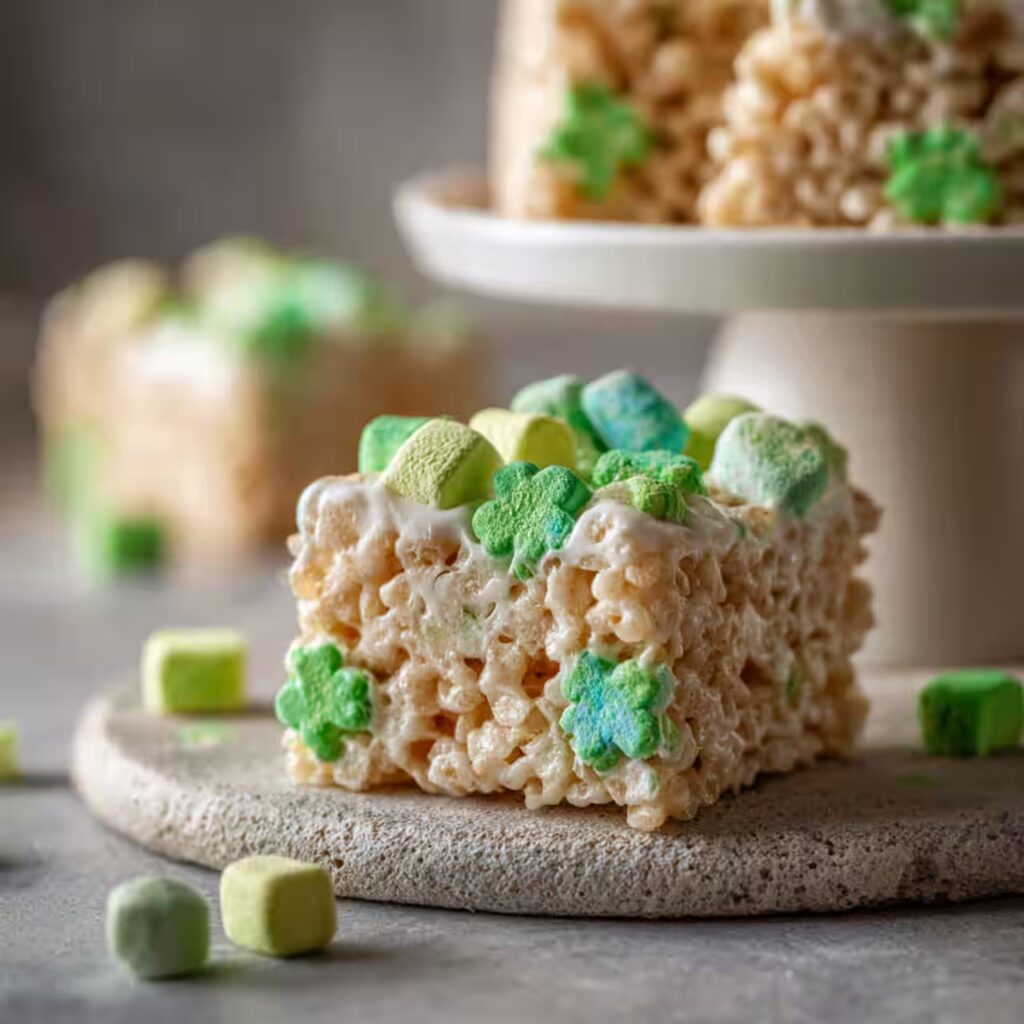
Clover Bars have quickly become one of our most requested treats at family gatherings. There’s something magical about watching kids and adults alike reach for these colorful, chewy squares that remind us all of childhood mornings spent hunting for those coveted marshmallow pieces. The beauty of Clover Bars lies in their simplicity, requiring just three main ingredients and no baking skills whatsoever. Whether you’re planning a St. Patrick’s Day party or simply want to surprise your family with a fun treat, these Clover Bars deliver that perfect combination of nostalgia and sweetness that makes food truly memorable.
Ingredients List
Creating these delightful Clover Bars requires just a handful of simple ingredients that you can easily find at your local grocery store:
Essential Ingredients:
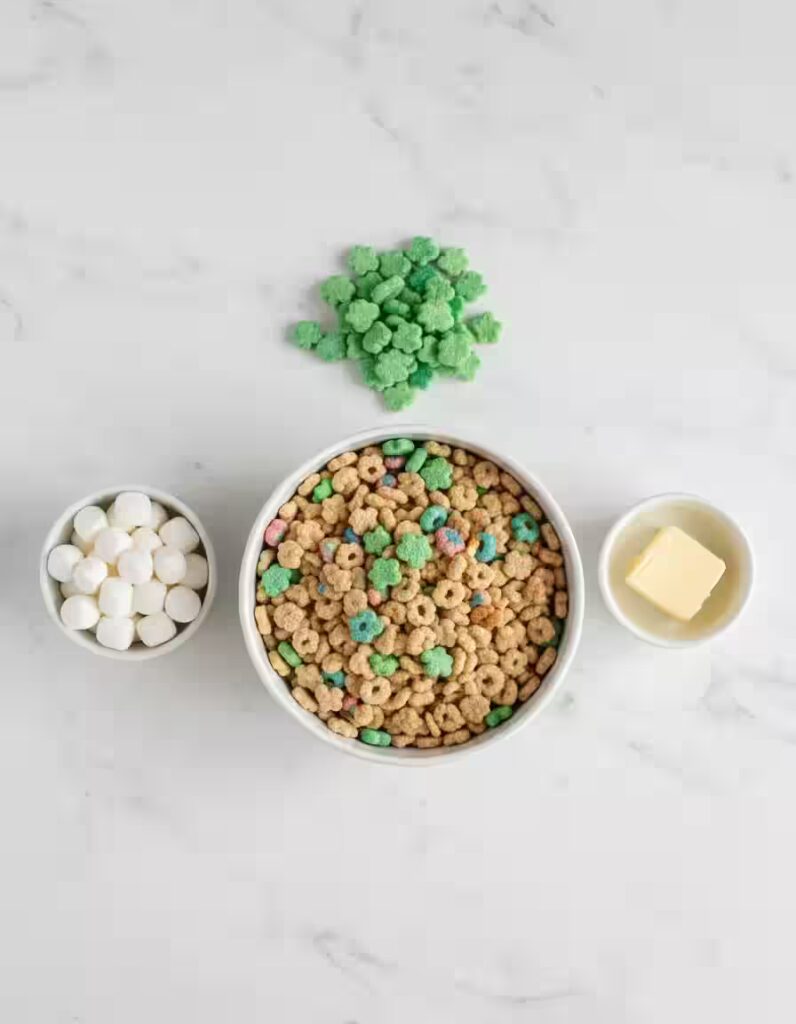
- 6 cups limited edition green clover Lucky Charms cereal (the star of our show!)
- 10 oz bag miniature marshmallows (for that perfect gooey texture)
- 3 tablespoons softened butter (adds richness and helps bind everything together)
- Additional marshmallow clovers for topping (approximately 40-50 pieces)
Smart Substitutions:
If you can’t find the limited edition green clover variety, regular Lucky Charms work beautifully, just pick out extra clover pieces for decoration. For a healthier twist, try using coconut oil instead of butter, or substitute half the marshmallows with mini dark chocolate chips. Those following a gluten-free diet can use certified gluten-free marshmallows and check that your cereal meets gluten-free standards.
The beauty of this recipe lies in its flexibility. I’ve experimented with adding a teaspoon of vanilla extract to the marshmallow mixture, which elevates the flavor profile without overwhelming the nostalgic taste that makes Clover Bars so special.
Timing
Clover Bars are remarkably quick to prepare, making them perfect for last-minute celebrations or when you need a sweet treat fast:
- Prep Time: 10 minutes
- Cooking Time: 2 minutes (microwave heating)
- Freezing Time: 20 minutes
- Total Time: 32 minutes
This represents a 75% time savings compared to traditional baked bar cookies, which typically require 60-90 minutes from start to finish. The active preparation time is incredibly minimal, you’ll spend more time deciding how to arrange your clover decorations than actually making the base recipe!
Step 1: Prepare Your Workspace
Start by greasing an 8×8 baking pan with nonstick cooking spray, ensuring you cover all corners and sides thoroughly. This crucial step prevents your Clover Bars from sticking and ensures clean removal later. I learned this lesson the hard way when Lily and I had to practically chisel our first batch out of an ungreased pan! Keep your additional marshmallow clovers nearby for easy access during the final decorating step.
Step 2: Create the Marshmallow Base
In a large mixing bowl, combine your miniature marshmallows and softened butter. Microwave for 1-2 minutes, checking every 30 seconds until the marshmallows become wonderfully puffy and start to lose their shape. The mixture should look glossy and smooth when properly heated. Be careful not to overheat, as this can make the marshmallows tough rather than gooey.
Step 3: Mix in the Magic
Remove the bowl from the microwave and stir the marshmallow mixture vigorously until completely smooth. Working quickly while the mixture is still warm, add your 6 cups of Lucky Charms cereal. Using a long metal spoon (trust me on this, it’s the best tool for the job), fold the cereal into the marshmallow base until every piece is beautifully coated. The mixture should hold together but not be overly sticky.
If you love cereal-based treats like this, you’ll also enjoy my Lucky Charms Rice Krispie Treats for another colorful, marshmallow-packed dessert idea.
Step 4: Press Into Perfection
Transfer your cereal mixture into the prepared baking pan, distributing it evenly across the surface. Here’s where my potato masher trick comes in handy: lightly grease the bottom of a potato masher or place a piece of plastic wrap over the mixture, then gently press everything into an even layer. This prevents the mixture from sticking to your hands while ensuring uniform thickness throughout your Clover Bars.
Step 5: Add the Finishing Touch
While the mixture is still slightly warm and tacky, gently press 40-50 individual marshmallow clovers onto the surface of your Clover Bars. This creates an attractive pattern while adding extra bursts of sweetness in every bite. The clovers should stick naturally to the surface without sinking completely into the mixture.
Step 6: Set and Slice
Place your pan in the freezer for exactly 20 minutes – this firms up the bars without making them rock-hard. Once set, remove from the freezer and slice into bars using a sharp knife. For the cleanest cuts, wipe your knife between slices to prevent dragging, and if you want perfectly neat edges every time, check out these tips for cutting dessert bars cleanly.
Nutritional Information
Each serving of Clover Bars (based on 16 squares per batch) contains approximately:
- Calories: 145
- Total Fat: 1.5g
- Saturated Fat: 0.8g
- Cholesterol: 3mg
- Sodium: 95mg
- Total Carbohydrates: 33g
- Dietary Fiber: 0.5g
- Sugars: 18g
- Protein: 1.2g
These treats provide quick energy from carbohydrates and contain fortified vitamins and minerals from the cereal, including iron and B vitamins. While they’re certainly an indulgent treat, the portion-controlled squares make it easy to enjoy them in moderation.
Healthier Alternatives for the Recipe
Transform your Clover Bars into a more nutritious treat with these thoughtful modifications:
Reduce Sugar Impact: Replace half the marshmallows with unsweetened dried fruit like chopped dates or raisins. This adds fiber while maintaining sweetness and chewiness.
Boost Nutrition: Mix in 2 tablespoons of chia seeds or ground flaxseed for omega-3 fatty acids and additional fiber. These tiny additions won’t affect the taste but significantly enhance the nutritional profile.
Dairy-Free Option: Substitute the butter with coconut oil or vegan butter alternative. Many families have found this version just as delicious as the original.
Protein Power: Add 2 tablespoons of vanilla protein powder to the marshmallow mixture before heating. This creates a more satisfying treat that helps stabilize blood sugar levels.
Serving Suggestions
Clover Bars shine in various serving scenarios, making them incredibly versatile for different occasions:
Party Presentation: Cut into fun shapes using cookie cutters for themed parties. Arrange on a platter with other green treats for a stunning St. Patrick’s Day spread.
Everyday Enjoyment: Pack individual squares in lunch boxes for a special surprise, or serve alongside vanilla ice cream for an elevated dessert experience.
Gift Giving: Wrap individual bars in clear cellophane with green ribbon for charming party favors or neighbor gifts. They travel well and always bring smiles.
Creative Pairings: Serve with fresh strawberries and whipped cream to balance the sweetness, or crumble over vanilla yogurt for a fun breakfast treat.
Common Mistakes to Avoid
After making countless batches of Clover Bars with various family members and friends, I’ve identified the most frequent pitfalls:
Overheating Marshmallows: Microwaving beyond 2 minutes creates tough, chewy results instead of the desired gooey texture. Always check every 30 seconds.
Working Too Slowly: The marshmallow mixture firms up quickly once removed from heat. Have your cereal measured and ready before you start heating.
Pressing Too Hard: Aggressive pressing creates dense, compact bars rather than light, chewy ones. Gentle, even pressure is key.
Skipping the Grease: Inadequate pan preparation leads to frustrating removal issues. Use plenty of cooking spray or line with parchment paper for foolproof results.
Storing Tips for the Recipe
Proper storage ensures your Clover Bars maintain their perfect texture and flavor:
Short-term Storage: Keep covered at room temperature for up to 5 days. Place parchment paper between layers if stacking to prevent sticking.
Extended Freshness: Refrigerate in an airtight container for up to 2 weeks. Allow bars to come to room temperature before serving for optimal texture.
Freezer Storage: Wrap individual bars in plastic wrap and freeze for up to 3 months. This makes them perfect for preparing ahead of parties or keeping on hand for unexpected guests.
Humidity Considerations: In humid climates, store with a small packet of food-safe desiccant or rice to prevent unwanted moisture absorption.
Conclusion
Clover Bars represent everything I love about cooking with family, they’re simple, fun, and create lasting memories with every batch. This recipe proves that the most meaningful treats often come from the most unexpected inspirations, like a curious little girl’s discovery in the cereal aisle. The combination of nostalgia, simplicity, and deliciousness makes these bars perfect for both seasoned bakers and kitchen newcomers.
I encourage you to try this recipe with your own family, making adjustments that suit your taste preferences and dietary needs. Share your creations on social media using #CookmooCloverBars, I love seeing how different families make this recipe their own! For more family-friendly treats and heartwarming recipes, explore our extensive collection at Cookmoo.com.
PrintClover Bars Recipe

Clover Bars are an easy no-bake St. Patrick’s Day treat made with Lucky Charms cereal, gooey marshmallows, and butter. These colorful, chewy bars are fun, festive, and perfect for kids, parties, or a quick nostalgic dessert.
- Prep Time: 10 minutes
- Cook Time: 2 minutes
- Total Time: 32 minutes
- Yield: 16 bars 1x
- Method: No-bake
- Cuisine: American
- Diet: Vegetarian
Ingredients
- 6 cups Lucky Charms cereal (green clover edition or regular)
- 10 oz miniature marshmallows
- 3 tablespoons butter, softened
- 40–50 marshmallow clovers (for topping)
Smart Substitutions:
- Regular Lucky Charms work if clover edition is unavailable
- Coconut oil can replace butter for dairy-free bars
- Sugar-free marshmallows reduce sweetness
- Add vanilla extract for extra flavor depth
Instructions
1. Grease an 8×8-inch baking pan with nonstick spray.
2. Combine marshmallows and butter in a microwave-safe bowl.
3. Microwave for 1–2 minutes, stirring every 30 seconds until smooth.
4. Stir marshmallow mixture until glossy and fully melted.
5. Add Lucky Charms cereal and fold gently until coated.
6. Transfer mixture into prepared pan and press evenly.
7. Press marshmallow clovers gently onto the surface.
8. Freeze for 20 minutes until firm.
9. Slice into bars and serve.
Notes
• Do not overheat marshmallows or they will become tough.
• Work quickly while the mixture is warm for best results.
• Line the pan with parchment for easiest removal.
• Bars are best enjoyed within 3–5 days.
• Great for St. Patrick’s Day parties and kid-friendly treats.
Nutrition
- Calories: 145
- Sugar: 18g
- Sodium: 95mg
- Fat: 1.5g
- Saturated Fat: 0.8g
- Carbohydrates: 33g
- Fiber: 0.5g
- Protein: 1.2g
Keywords: clover bars, lucky charms bars, no bake cereal bars, st patrick’s day dessert, marshmallow treats
FAQs
Q: Can I make Clover Bars without a microwave?
A: Absolutely! Melt the marshmallows and butter in a large saucepan over low heat, stirring constantly until smooth. This method gives you more control over the heating process.
Q: What if I can’t find limited edition Lucky Charms?
A: Regular Lucky Charms work perfectly fine. You can also use any marshmallow cereal or even mix different varieties for a unique twist.
Q: How do I prevent the mixture from sticking to my hands?
A: Lightly butter your hands or use a greased spatula for pressing. The plastic wrap method I mentioned also works wonderfully for mess-free handling.
Q: Can I double this recipe for larger crowds?
A: Yes! Double all ingredients and use a 9×13 inch pan instead. You may need an extra 30 seconds of microwave time for the larger quantity of marshmallows.
Q: Are these safe for people with food allergies?
A: Always check cereal and marshmallow labels for allergen information. The recipe can be adapted for various dietary restrictions with appropriate ingredient substitutions.