Introduction
I still remember the first time I tasted a Shamrock Shake Pudding Cup at my grandmother’s house in small-town Georgia. It was March, and Grandma had just discovered instant pudding mixes at the local grocery store. Being the creative soul she was, she decided to recreate the famous McDonald’s seasonal treat in her own special way. The kitchen filled with the sweet aroma of chocolate and mint as she layered those beautiful green and brown puddings in her vintage glass cups. My little hands could barely contain my excitement as I watched her create what felt like pure magic in dessert form.

Now, as a father watching my daughter Lily attempt to “help” me make these same Shamrock Shake Pudding Cups (which mostly involves her sneaking spoonfuls when she thinks I’m not looking), I understand why this recipe has become such a beloved tradition in our family. These Shamrock Shake Pudding Cups capture all the nostalgic flavors of that iconic seasonal shake while being incredibly simple to prepare at home. The combination of rich chocolate and refreshing mint creates a dessert that’s both indulgent and refreshing, perfect for celebrating St. Patrick’s Day or simply satisfying a sweet craving any time of year.
What makes Shamrock Shake Pudding Cups so special is their ability to transform simple pantry ingredients into something that feels genuinely festive and exciting. Every spoonful delivers that perfect balance of chocolate richness and cool mint flavor that made the original shake so popular.
Ingredients List
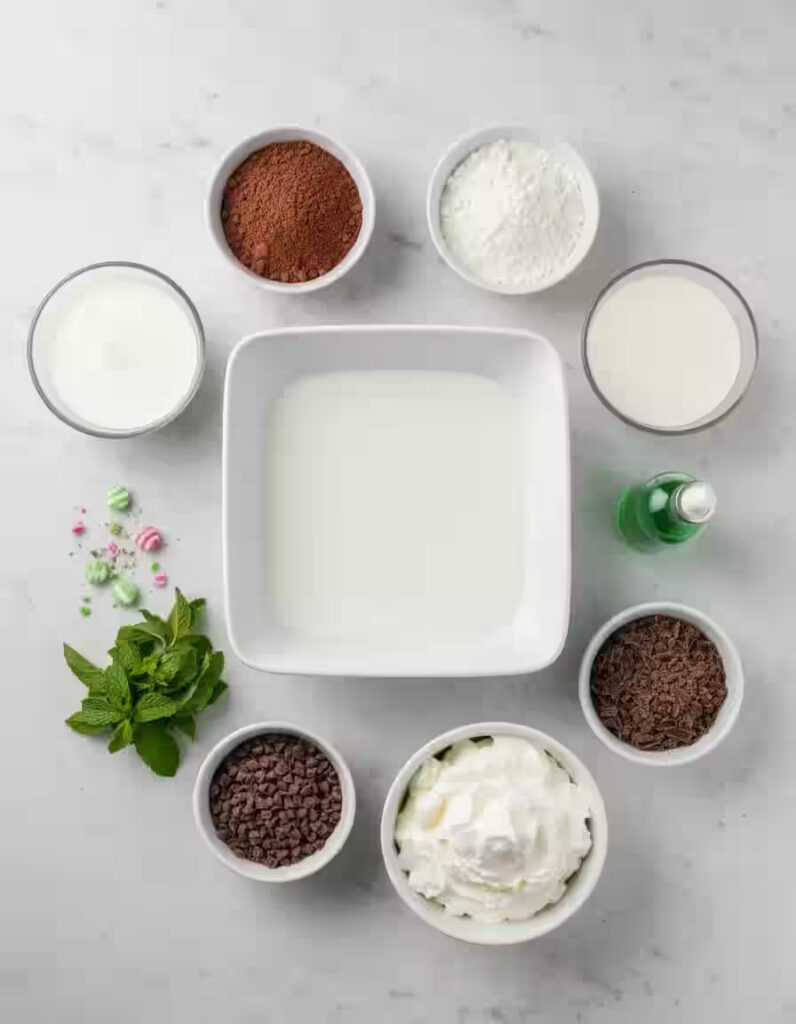
Creating these delightful Shamrock Shake Pudding Cups requires just a handful of ingredients that you likely already have in your pantry:
For the Chocolate Layer:
- 1 package (3.4 oz) instant chocolate pudding mix
- 2 cups whole milk (for richer texture) or 2% milk
For the Mint Layer:
- 1 package (3.4 oz) instant vanilla or white chocolate pudding mix
- 2 cups milk
- Green food coloring (gel works best for vibrant color)
For Assembly and Garnish:
- 1 cup heavy whipping cream or store-bought whipped topping
- Chocolate shavings, mini chocolate chips, or crushed Oreo cookies
- Fresh mint leaves or crushed peppermint candies (optional)
Smart Substitutions:
- Replace regular milk with almond, oat, or coconut milk for dairy-free versions
- Use sugar-free pudding mixes for reduced calories
- Substitute Greek yogurt mixed with a touch of honey for the whipped cream layer
- Add a few drops of peppermint extract if you want a stronger mint flavor
Timing
Preparation Time: 15 minutes
Chilling Time: 30 minutes minimum
Total Time: 45 minutes
This recipe is remarkably efficient, taking 60% less time than traditional from-scratch pudding recipes. The beauty of using instant pudding mixes means you can have these Shamrock Shake Pudding Cups ready for guests with minimal active cooking time, making them perfect for last-minute entertaining or satisfying sudden dessert cravings.
Create the Chocolate Pudding Base
Start by whisking the chocolate pudding mix with 2 cups of cold milk in a medium mixing bowl. I always tell my readers to use a wire whisk rather than a spoon here because it prevents those frustrating lumps that can ruin the smooth texture we’re after. If you enjoy easy chocolate-forward desserts like this, you might also love my Mint Oreo Bark, which delivers rich chocolate flavor with minimal prep. Whisk vigorously for about 2 minutes until the mixture is completely smooth and begins to thicken. Let it rest for exactly 5 minutes to achieve that perfect creamy consistency.
Prepare the Mint Pudding Layer
In a separate clean bowl, combine the vanilla pudding mix with 2 cups of cold milk. This is where the magic happens! Add 3-4 drops of green food coloring (start with less, you can always add more) and whisk until you achieve that signature shamrock green color. The goal is a vibrant but not overwhelming green that reminds you of fresh spring leaves. Allow this mixture to thicken for 5 minutes as well. Pro tip from my grandmother’s playbook: taste the mint layer and add a tiny drop of peppermint extract if you want more mint intensity.
Layer Your Pudding Cups
Choose clear glasses or dessert cups to showcase those beautiful contrasting layers. Start with about 2 tablespoons of chocolate pudding in the bottom of each cup, then gently spoon the same amount of mint pudding on top. Repeat this layering process until your cups are about 3/4 full, leaving room for the whipped cream topping. The key to clean layers is using a small spoon and pouring slowly over the back of the spoon to prevent the layers from mixing.
Add the Whipped Cream Crown
If using heavy cream, whip it to soft peaks with a hand mixer (this takes about 3-4 minutes). For store-bought whipped topping, simply give it a gentle stir. Dollop a generous amount on top of each pudding cup, creating that classic shake-like appearance. This creamy layer balances the sweetness of the puddings perfectly.
Final Garnish and Chill
Sprinkle chocolate shavings, mini chocolate chips, or crushed cookies over the whipped cream. For an extra special touch, add a small fresh mint leaf or a few crushed peppermint candies. Refrigerate the completed Shamrock Shake Pudding Cups for at least 30 minutes before serving to allow all the flavors to meld together beautifully.
Nutritional Information
Each serving of Shamrock Shake Pudding Cups contains approximately:
- Calories: 280-320
- Protein: 8g
- Carbohydrates: 45g
- Fat: 9g
- Fiber: 1g
- Sugar: 38g
- Calcium: 25% Daily Value
These desserts provide a good source of calcium and protein from the milk, while the portion-controlled cups help manage serving sizes naturally.
Healthier Alternatives for the Recipe
Transform these Shamrock Shake Pudding Cups into a more nutritious treat without sacrificing flavor. Replace regular pudding mixes with sugar-free versions to reduce calories by approximately 30%. If you’re looking for lighter St. Patrick’s Day dessert ideas that still feel indulgent, my Lucky Charms Rice Krispie Treats are another great option. Use unsweetened almond milk instead of whole milk to cut calories further while adding a subtle nutty flavor.
Serving Suggestions
These Shamrock Shake Pudding Cups shine at St. Patrick’s Day celebrations, but they’re delightful year-round. Serve them alongside Irish coffee for adults or pair with sugar cookies shaped like shamrocks for children’s parties. For elegant dinner parties, present them in wine glasses with gold-rimmed spoons for a sophisticated touch. Create a dessert bar by offering various toppings like crushed cookies, different chocolate varieties, or fresh berries. During summer months, partially freeze them for 2 hours to create a refreshing frozen treat that rivals any ice cream shop offering.
Common Mistakes to Avoid
The most frequent error when making Shamrock Shake Pudding Cups is rushing the thickening process. Always allow each pudding layer the full 5 minutes to set properly, or your layers will blend together instead of maintaining distinct separations. Another common mistake is using warm milk, which prevents proper thickening and can create a runny consistency. Always use cold milk straight from the refrigerator. Over-mixing when adding food coloring can also create an artificial-looking bright green; aim for a natural, appealing shade instead. Finally, avoid filling cups completely to the brim, as the pudding continues to expand slightly as it chills.
Storing Tips for the Recipe
Shamrock Shake Pudding Cups store beautifully in the refrigerator for up to 3 days when covered with plastic wrap or stored in airtight containers. For best results, add the whipped cream topping just before serving to maintain optimal texture. The pudding layers can be prepared up to 24 hours in advance, making these perfect for meal prep or party planning. If making ahead, store the components separately and assemble just before guests arrive. These desserts are not suitable for freezing due to the dairy content, but they maintain their creamy texture wonderfully when properly refrigerated.
Conclusion
Shamrock Shake Pudding Cups represent everything I love about cooking: they’re simple enough for beginners, delicious enough to impress guests, and filled with the kind of nostalgic flavors that create lasting memories. Whether you’re celebrating St. Patrick’s Day with family, hosting a dinner party, or simply treating yourself to something special, this recipe delivers consistent results with minimal effort. The combination of rich chocolate and refreshing mint, topped with fluffy whipped cream, creates a dessert that feels both indulgent and refreshing.
Ready to create some magic in your own kitchen? Gather your ingredients and start layering these delightful Shamrock Shake Pudding Cups today! I’d love to hear about your experience making this recipe, so please share your photos and variations in the comments below. For more nostalgic dessert recipes that bring families together, explore our collection of vintage-inspired treats that are sure to become new favorites in your household.
PrintShamrock Shake Pudding Cups Recipe

These Shamrock Shake Pudding Cups are a festive, no-bake dessert inspired by the iconic seasonal shake. With creamy chocolate pudding, refreshing mint layers, and fluffy whipped topping, this easy treat is perfect for St. Patrick’s Day celebrations or anytime you crave a cool, nostalgic dessert.
- Prep Time: 15 minutes
- Cook Time: 0 minutes
- Total Time: 45 minutes
- Yield: 6 pudding cups
- Method: No-bake
- Cuisine: American
- Diet: Vegetarian
Ingredients
For the Chocolate Layer:
• 1 package (3.4 oz) instant chocolate pudding mix
• 2 cups cold milk
For the Mint Layer:
• 1 package (3.4 oz) instant vanilla or white chocolate pudding mix
• 2 cups cold milk
• Green food coloring (gel recommended)
For Assembly & Garnish:
• 1 cup heavy whipping cream or whipped topping
• Chocolate shavings, mini chocolate chips, or crushed Oreos
• Fresh mint leaves or crushed peppermint (optional)
Substitutions:
• Use almond, oat, or coconut milk for dairy-free versions
• Sugar-free pudding mixes for reduced sugar
• Greek yogurt + honey in place of whipped cream
• Add peppermint extract for stronger mint flavor
Instructions
1. Whisk chocolate pudding mix with 2 cups cold milk until smooth and thickened; rest 5 minutes.
2. In a separate bowl, whisk vanilla pudding mix with 2 cups cold milk.
3. Add green food coloring to vanilla pudding and whisk until evenly colored; rest 5 minutes.
4. Spoon chocolate pudding into clear cups, followed by mint pudding.
5. Repeat layers until cups are 3/4 full.
6. Top with whipped cream.
7. Garnish with chocolate shavings, chips, or crushed cookies.
8. Chill for at least 30 minutes before serving.
Notes
• Always use cold milk for proper pudding set.
• Let each pudding layer thicken before assembling for clean layers.
• Add whipped cream just before serving for best texture.
• Perfect make-ahead dessert for St. Patrick’s Day parties.
• Store covered in the refrigerator for up to 3 days.
Nutrition
- Calories: 300
- Sugar: 38g
- Sodium: 180mg
- Fat: 9g
- Saturated Fat: 5g
- Carbohydrates: 45g
- Fiber: 1g
- Protein: 8g
Keywords: shamrock shake pudding cups, st patrick’s day dessert, mint chocolate pudding, no bake pudding, holiday desserts
FAQs
Can I make Shamrock Shake Pudding Cups without artificial food coloring?
Absolutely! Try using natural alternatives like spirulina powder for green color, or simply leave the mint layer white for an elegant two-toned effect. Matcha powder can also provide a beautiful green color while adding a subtle earthy flavor that complements the mint perfectly.
How far in advance can I prepare these pudding cups?
You can prepare the pudding layers up to 24 hours ahead, but add the whipped cream topping no more than 4 hours before serving to prevent it from deflating or absorbing into the pudding layers.
What’s the best way to create clean, distinct layers?
Pour each pudding layer slowly over the back of a spoon held close to the surface of the previous layer. This technique prevents the layers from mixing and creates those beautiful, Instagram-worthy distinct stripes.
Can I use homemade pudding instead of instant mix?
Yes, but allow homemade pudding to cool completely before layering, and the total preparation time will increase to about 2 hours including cooling time. The convenience of instant pudding makes this recipe particularly appealing for quick dessert needs.
Are there dairy-free options that still taste authentic?
Coconut milk creates the creamiest dairy-free version, while oat milk provides a neutral flavor that won’t compete with the chocolate and mint. Many readers report excellent results using these plant-based alternatives without compromising the classic Shamrock Shake Pudding Cups experience.